We research products independently from specs, manufacturer documentation, warranty terms and owner feedback. When you buy through links on this page, we may earn a commission at no extra cost to you. As an Amazon Associate we earn from qualifying purchases.
Quick answer
The best robot vacuum setup tips come down to three things: put the dock in an open spot on hard floor with good Wi-Fi, prepare the room before the first mapping run, and fix problems with no-go zones and schedules rather than giving up. Follow the 15 steps below in order, give the robot a full week to learn your home, and update its firmware on day one. Most first-week frustrations come from skipping the prep, not from the robot itself.
A robot vacuum is the rare appliance that gets better after you unbox it. The first map, the dock position and the first few schedules decide whether it quietly runs in the background or gets stuck under the couch every day. These robot vacuum setup tips walk you through the process step by step, from before the box arrives to the end of week one. Our advice is based on manufacturer documentation, specs, independent review consensus and owner-feedback patterns.
If you have not picked a robot yet, our complete robot vacuum buying guide covers how to choose one. This page assumes it is on its way.
Which robots are easiest to set up
Setup is easier on some robots than others. LiDAR models map quickly and reliably in any lighting; robots with a self-empty base save you from emptying the bin during the long first runs; and simpler docks have fewer tanks to fill and parts to check. Here is a quick comparison of how setup differs by robot type, using models from our picks.
| Robot | Dock type | Mapping | Setup effort | Ongoing first-week tasks |
|---|---|---|---|---|
| eufy RoboVac 11S | Charging dock only | None, random navigation | Lowest | Empty bin by hand |
| Shark AV2501S AI Ultra Robot Vacuum | Bagless self-empty base | LiDAR | Low | Check base after first runs |
| eufy Robot Vacuum Omni C20 | Compact all-in-one station | Smart navigation | Moderate | Fill clean water tank |
| Roborock Qrevo S Robot Vacuum and Mop | Self-empty, mop wash and dry | LiDAR | Moderate | Fill and empty water tanks |
| iRobot Roomba Combo j9+ | Auto-empty base, lifting mop | Camera-based, avoids obstacles | Moderate | Review obstacle photos and privacy settings |
Easiest full-featured setup Our verdict: Buy
Roborock Qrevo S Robot Vacuum and Mop
Typical price: $499–$799
Most homes that want a vacuum and mop robot without a complicated first week
- Pros
- ✓ LiDAR maps quickly and reliably
- ✓ self-emptying dock means long first runs need no bin emptying
- ✓ washes and dries mop pads
- Cons
- ✕ Dock needs space and water tank checks
- ✕ more settings to work through
Check price on Amazon Paid link
Simplest self-empty setup Our verdict: Buy
Shark AV2501S AI Ultra Robot Vacuum
Typical price: $299–$449
Pet owners and carpet-heavy homes that want a set-and-forget robot
- Pros
- ✓ Bagless self-empty base, no bags to install
- ✓ LiDAR mapping
- ✓ no water system to set up
- Cons
- ✕ No mop-washing dock
- ✕ bagless base needs occasional cleaning
Check price on Amazon Paid link
Easiest for small spaces Our verdict: Buy
eufy Robot Vacuum Omni C20
Typical price: $399–$599
Apartments where the dock has to fit in a tight spot
- Pros
- ✓ Compact all-in-one station
- ✓ slim body fits under furniture
- ✓ about $399–$599
- Cons
- ✕ Smaller tanks than full-size docks
- ✕ mopping is less advanced than premium docks
Check price on Amazon Paid link
Best for clutter and pets Our verdict: Consider
iRobot Roomba Combo j9+
Typical price: $899–$1,399
Homes where cords and pet waste are the biggest risk during the first runs
- Pros
- ✓ Avoids cords and pet waste
- ✓ mop lifts onto the top so rugs stay dry
- ✓ auto-empty base
- Cons
- ✕ About $899–$1,399
- ✕ camera-based features mean reviewing privacy settings
Check price on Amazon Paid link
Before it arrives
1. Pick the dock spot
The dock location matters more than any other setup choice. Look for a spot that is:
- On hard floor, against a wall, with the dock level. Thick rugs make docking unreliable.
- Open in front and at the sides. Manuals commonly ask for clear space on both sides and a longer clear runway in front; check your model’s manual for exact distances.
- Near an outlet without the cord crossing the robot’s path.
- Central, so the robot does not cross the whole home on every trip back to recharge.
- Away from stairs, direct sun on the sensors and heating vents.
- Within strong Wi-Fi range, since the dock is where the robot will sit and receive updates.
For mop docks, also think about how easily you can lift out the water tanks to refill them. A hallway corner near the kitchen often works well.
2. Check your Wi-Fi
Many robot vacuums only connect on 2.4 GHz Wi-Fi. If your router combines 2.4 GHz and 5 GHz under one name, setup usually still works, but if pairing fails, temporarily separating the bands in your router app often solves it. Walk to the far rooms with your phone: if Wi-Fi is weak there, the robot may lose its connection mid-clean, which affects app control and map updates.
3. Plan your no-go areas on paper
Think now about areas the robot should avoid: pet bowls, a play mat, a sculpture on a low stand, a tangle of desk cables, or a shag rug. Writing them down makes the app setup in step 9 quick. Also note thresholds: most robots climb about 2 cm, so measure any sills that look tall.
4. Order a spare consumables kit
Side brushes and filters are replaced every few months, and having spares on hand means you never delay maintenance. Search for the kit matching your model, such as a Roborock Qrevo S replacement kit. If you are deciding between a robot and other vacuum types before you buy, our robot vacuum vs stick vacuum comparison explains which jobs each handles best.
Day one: setup and first map
5. Unbox, charge and remove the packaging bits
Remove every piece of tape, foam and protective film, including the small pieces on the bumper, sensors and LiDAR turret if your model has one. Attach the side brushes. Place the robot on the dock and let it charge fully before the first run; a full battery lets it finish the mapping run in one go.
6. Install the app and update firmware
Download the brand’s app, create an account and add the robot. Before your first clean, check for a firmware update and install it. Updates often improve navigation, obstacle avoidance and docking. If your robot supports Matter or your smart speaker platform, you can link it later; get the basics running first.
7. Set privacy options
This step is easy to skip and worth doing. In the app, look for:
- Whether the robot has a camera, and whether images are processed on the device or uploaded to the cloud.
- Settings to turn off photo uploads or obstacle image sharing.
- Data-sharing and product improvement toggles.
- Who has access to the account, especially if you share it with family.
Camera-based obstacle avoidance can be very useful, so the goal is not to switch it off, but to know where the images go.
8. Prepare the room and run the first map
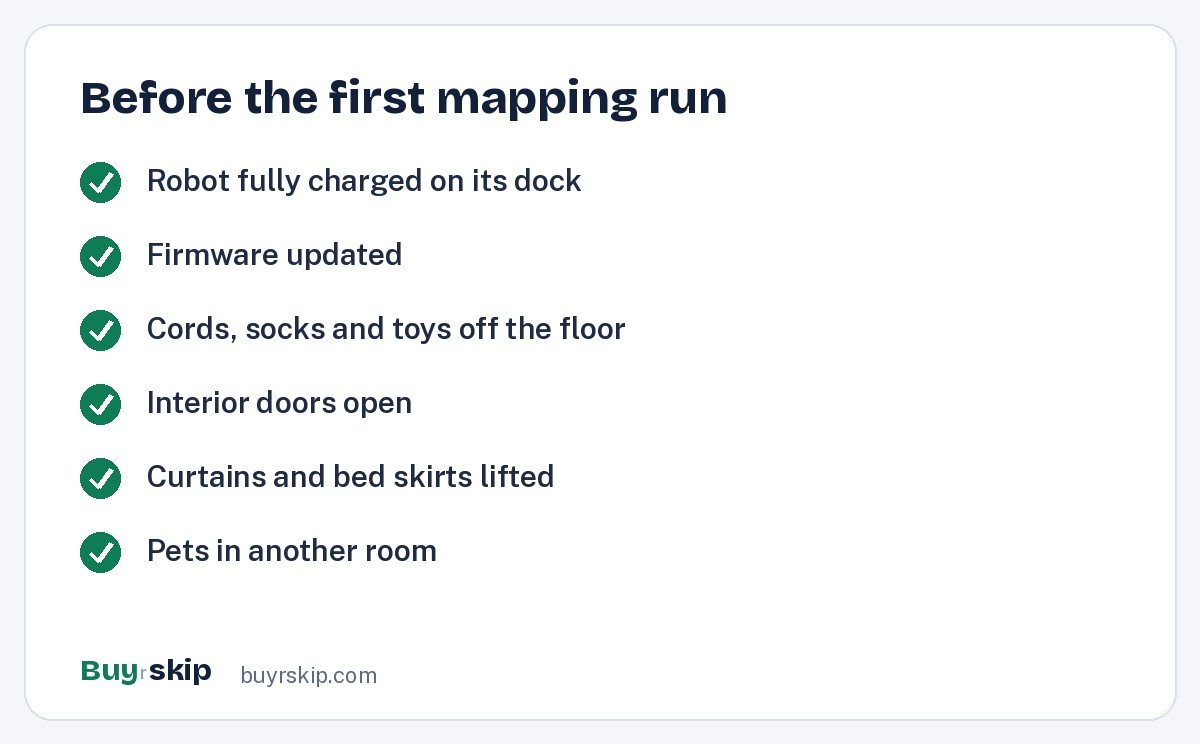
The first map shapes everything that follows. Before you press start:
- Pick up cords, socks, toys, phone chargers and pet toys.
- Open every interior door you want mapped.
- Lift curtain hems and bed skirts that hang to the floor.
- Move light chairs so the robot can see the full room outline.
- Turn on lights if your robot uses camera navigation.
Many apps offer a quick mapping mode that maps without cleaning. Use it if available, then let the robot finish uninterrupted. Do not pick it up or move the dock during this run.
9. Edit the map: rooms, names and no-go zones
Once the map appears, clean it up:
- Split and merge rooms so they match how you live. An open-plan kitchen and living room are easier to schedule as separate rooms.
- Name each room, which makes voice commands and schedules simpler.
- Add no-go zones from your list in step 3, and no-mop zones over rugs if your robot mops.
- Add invisible walls at the top of a sunken living room or near a fragile display.
Save the map. If your home has more than one floor, check whether your model can store multiple maps.
The first week: tune it
10. Start with suction and mop settings in the middle
Use the default or middle suction setting for the first few runs. Turn it up for rugs and high-traffic rooms only after you see how the robot handles them. For mopping robots, begin with a moderate water level: too much water on wood floors is a common first-week mistake. Enable carpet detection so mops lift or avoid rugs. Check also how long your robot’s carpet lift is, since thick rugs may still need a no-mop zone.
11. Run room-by-room cleans, not the whole home
For the first few days, clean one or two rooms at a time while you are home. Watch where the robot struggles: a chair base it climbs onto, a gap under the sofa where it gets wedged, a rug fringe it chews. Each problem has a fix: a no-go zone, a furniture riser, or tucking the fringe under.
12. Set a schedule that fits your life
Once the robot runs cleanly, set a schedule. A few principles:
- Run it while you are out, since even quiet models are noticeable.
- Clean high-traffic rooms more often, like the kitchen and entry daily, bedrooms less often.
- Avoid running during pet mealtimes or when floors are likely to be cluttered.
- Use quiet or do-not-disturb hours so the robot does not resume a clean at night.
13. Check the dock and robot after day three
After a few runs, check that the self-empty base is pulling debris from the robot, the water tanks are draining and refilling correctly, and hair is not wrapping around the main brush. Clean the cliff sensors and charging contacts with a dry microfiber cloth.
14. Fix stuck spots with small physical changes
Software fixes do not solve everything. Useful physical tweaks:
- Furniture risers to give the robot clearance under a low sofa or bed.
- Cable clips or a cord box to keep chargers off the floor.
- A threshold ramp for a sill just above the robot’s climbing limit.
- Moving a lightweight floor lamp or plant stand that the robot keeps bumping.
You can find these with an Amazon threshold ramp search or search for furniture risers.
15. Set a maintenance routine for the long term
End the week by setting reminders in the app for brushes, filters and mop pads. Plan to cut hair off the main brush weekly in pet homes, empty and rinse mop tanks regularly, and wipe the sensors monthly. These habits are the difference between a robot that lasts and one that fades early; our guide to the most durable robot vacuums explains which parts wear out and how to keep them replaceable.
A quick comparison of robot vacuum setup tips by home type
How you approach these steps depends on your home and on what you are comparing the robot against. Compared with the alternatives, robot vacuum setup takes the most up-front effort: a cordless stick needs only a wall mount and a charge, while a robot needs a dock spot, an app and a map. The payoff is that after week one, the robot needs far less of your time.
- Small apartment: Prioritize dock placement and storage. A compact station like the eufy Robot Vacuum Omni C20 fits more easily; our small-apartment guide covers layouts.
- Pet home: Prioritize obstacle avoidance, daily schedules and weekly brush cleaning. The Shark AV2501S AI Ultra Robot Vacuum keeps setup simple, and the iRobot Roomba Combo j9+ adds pet-waste avoidance.
- Large hard floors: Prioritize mop settings and no-mop zones over rugs. The Roborock Qrevo S handles washing and drying pads for you.
- Tight budget: The eufy RoboVac 11S has the simplest setup of all, with no map or app zones to configure, but you trade away room-by-room control.
- Thresholds and multiple levels: Measure sills first. The Dreame X50 Ultra Complete can step over small thresholds that stop most robots.
How much a smooth setup costs
Setup effort scales with the dock. The chart below shows the typical starting price for each dock tier from our picks, so you can weigh convenience against complexity.
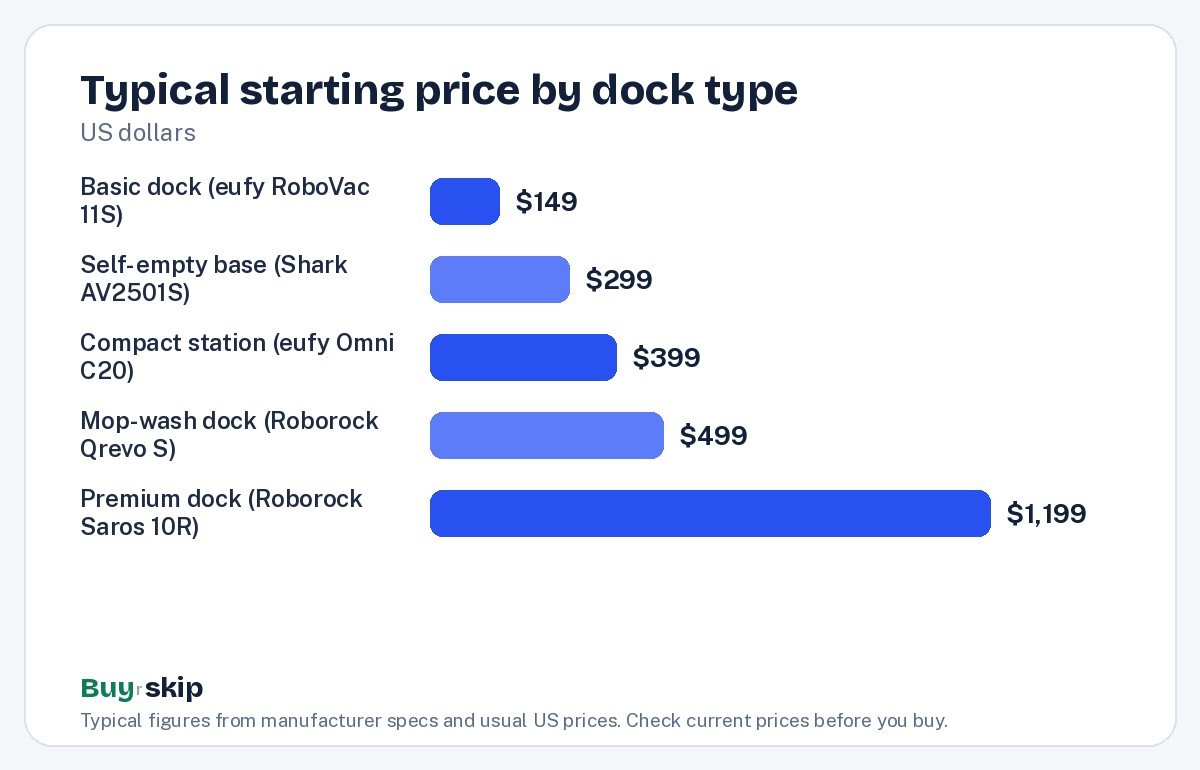
More dock features mean more first-week setup and maintenance, but less weekly effort once everything is tuned. If you want a hands-off dock with a slim robot that fits under low furniture, the Roborock Saros 10R is the premium option, at about $1,199–$1,599. Check current prices before deciding.
Common setup mistakes to avoid
- Running the first clean before updating firmware. You may be mapping with older navigation software.
- Placing the dock in a cramped corner. The robot will struggle to dock and may stop short of a full charge.
- Moving the dock after mapping. Many robots then get confused about where home is.
- Mapping with doors closed. You will end up with missing rooms and need to remap.
- Maxing out suction and water from day one. It drains the battery faster and can overwet floors.
- Giving up after two days. Most problems disappear once zones and schedules are tuned.
Frequently asked questions
How long does it take a robot vacuum to map a home?
It depends on the size of your home, the robot and whether it uses a quick mapping mode. Many LiDAR robots can map a typical home in a single run. Camera-based robots may take a few runs to build a complete map. Keep the floor clear and doors open, and do not move the robot or dock until the first map is saved.
Why does my robot vacuum not connect to Wi-Fi?
The most common cause is a 5 GHz-only connection: many robots only support 2.4 GHz. Try separating your router’s bands temporarily, standing close to the router during pairing and turning off any VPN on your phone. Also check that your password has no unusual characters the app might reject. Once paired, the robot usually stays connected after you recombine bands.
Where is the best place to put a robot vacuum dock?
Put it on hard floor against a wall, in a central spot with open space in front and on both sides, near an outlet and with good Wi-Fi. Avoid stairs, direct sun and thick rugs. For mop docks, choose a spot where you can easily lift out the water tanks. Once you have mapped, avoid moving the dock.
Should I run my robot vacuum every day?
For most homes with pets or heavy foot traffic, daily runs work well, since frequent light cleaning stops hair and dust from building up. In quieter homes, every other day may be enough. Schedule high-traffic rooms more often than bedrooms, and run the robot while you are out so noise is not a bother.
Do I need to tidy up before every robot vacuum run?
You need to keep cords, socks, small toys and loose cables off the floor. Robots with obstacle avoidance handle clutter better, but a clear floor still means faster, more complete cleaning and less wear on the brushes. A quick five-minute pickup, or scheduling runs right after your usual tidy, is usually enough.
How do I stop my robot vacuum getting stuck?
Watch the first few runs to find problem spots, then fix them with no-go zones, invisible walls, furniture risers or threshold ramps. Common traps are low sofas, chair bases, rug fringes and tangles of cables. Keeping firmware updated also helps, since navigation improvements often arrive through updates.
Is setting up a robot vacuum harder than a stick vacuum?
Yes, at first. A stick vacuum just needs a charge and a place to store it. A robot needs a dock spot, an app, Wi-Fi and a map. The difference is that after the first week, a robot works on its own schedule while a stick still needs you every time. That trade usually favors the robot for daily floor upkeep.
The bottom line
Good robot vacuum setup tips are mostly about preparation: a good dock spot, a clear first map, updated firmware and a week of patient tuning. Do those 15 steps in order and most robots will run reliably with very little attention.
If you want the easiest full-featured setup, a LiDAR robot with a self-emptying, mop-washing dock is the best balance. Check the current price before you buy.
Check price on Amazon: Roborock Qrevo S Robot Vacuum and Mop
Paid link. Typical price $499–$799; check the current price on Amazon.